In the ever-evolving landscape of virtualization and server management, one name has consistently stood out for its reliability, versatility, and innovation – Proxmox. Especially now, just after Broadcom dropped the free ESXi solution, Proxmox might be the real gamechanger. Traditionally associated with x86 architectures, Proxmox has been a stalwart companion for enterprises and enthusiasts alike, providing a robust platform for virtualization and container orchestration. However, as technology progresses and the demand for diversity in hardware options surges, the spotlight is now turning towards alternative architectures, with ARM64 emerging as a formidable contender.
This blog post aims to unravel the untapped potential of running Proxmox on non-traditional hardware architectures, with a special focus on the ARM64 architecture. As we delve into the benefits, challenges, and the transformative impact of this choice, we invite you on a journey that explores the boundaries of what Proxmox can achieve beyond its familiar x86 habitat.
Why should you consider Proxmox on ARM64? What advantages does it bring to the table, and how can it reshape the way we approach virtualization on diverse hardware?
The multi-core advantage of ARM64 architecture becomes a game-changer in the world of virtualization. By distributing workloads across multiple cores, ARM64 systems exhibit improved parallel processing capabilities, enhancing overall performance and responsiveness. This becomes particularly significant in virtualized environments, where resource allocation and workload distribution are pivotal for achieving optimal efficiency. But what makes ARM64 even more compelling for virtualization is its ability to maintain high performance while consuming less power. This not only translates to cost savings but also aligns with the global shift towards more energy-efficient computing solutions.
Information
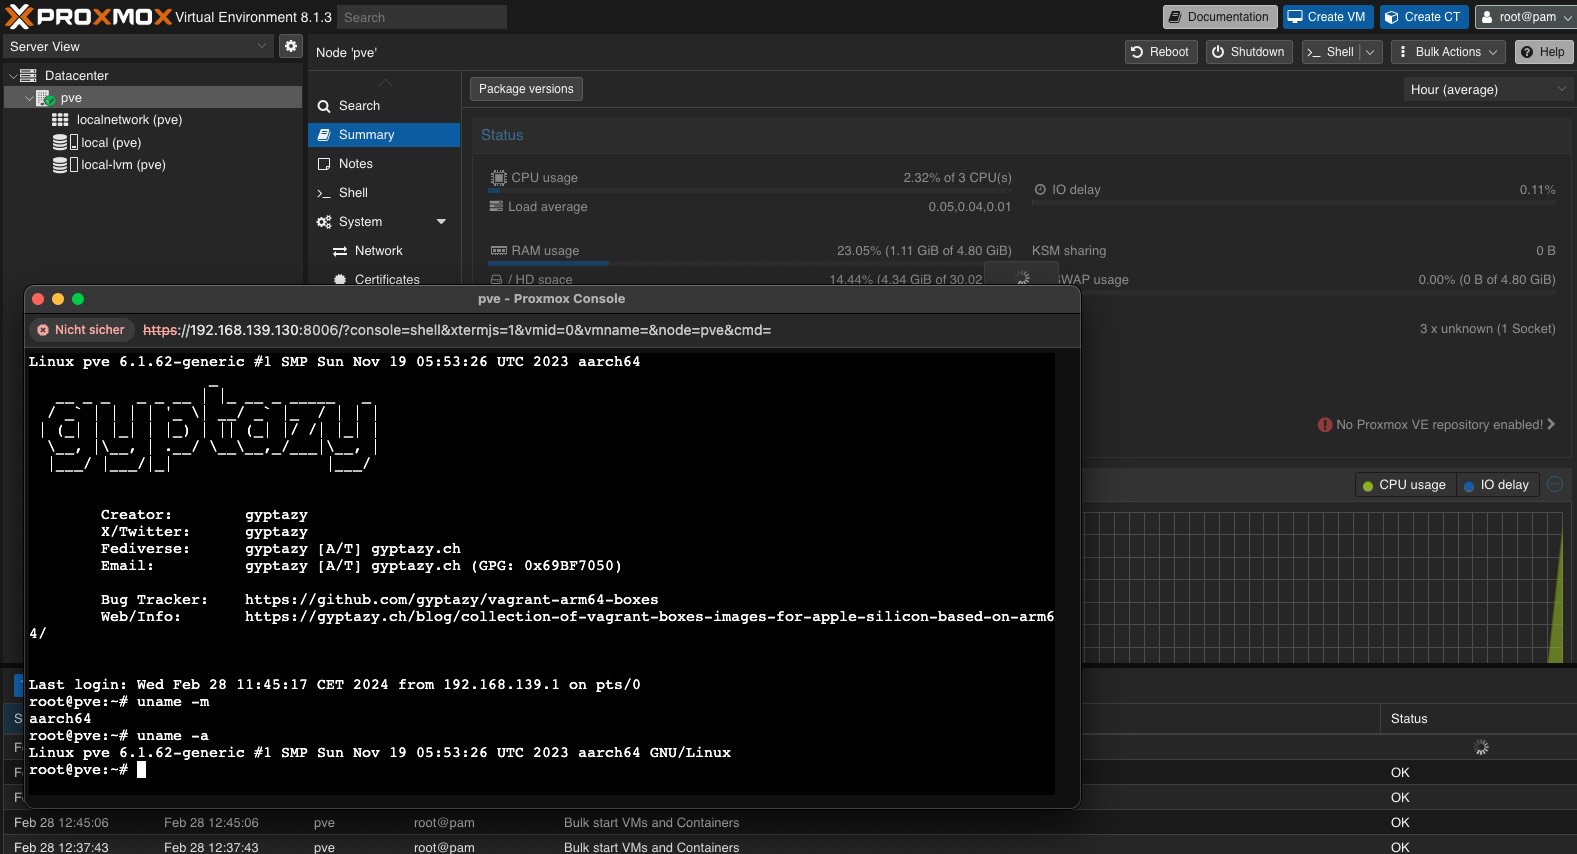
In the world of software, installation methods vary, offering users flexibility and choice. The method you choose depends on factors like your operating system, technical expertise, and specific requirements. This chapter explores three common installation methods: compiling from source, using Debian (deb) packages from a repository, and employing an ISO installer for bare metal systems. This post will guide you through all three options. The probably easiest one will be by installing from an ISO image which can also be used for Ampere server systems in data centers like NetCup, Oracle or Hetzner.
 |
Sources
The user jiangcuo created a Proxmox-Port for the ARM64 and RISC-V (RV64) based hardware architecture. This includes Proxmox VE and the Proxmox Backup Server based on forks of the official repositories. The patched sources can be found here:
* zfsonlinux
* pve-qemu
* pve-lxc-syscalld
* pve-lxcfs
* pve-installer
* pve-edk2-firmware
* proxmox-mini-journalreader
* proxmox-backup
* proxmox-backup-restore-image
* proxmox-backup-qemu
* pve-manager
* qemu-server
* pve-port-kernel
* pve-common
* pve-qemu
* pve-container
* lxcfs
When checking out the repositories keep in mind that the master is still 1:1 the upstream project. Switching to the branch name arm64 is required before compiling the sources and creating the final packages.
Compiling from Sources
For compiling the binaries from the sources a Debian 12 Bookworm image (running on ARM64) should be used. Further hints regarding compiling Proxmox in general can be found in Proxmox's README.dev document.
Rust Devel Packages:
This repository contains the devel packages of the Rust binaries that are needed to build Proxmox. Build-Dependencies can be fulfilled by running:
mk-build-deps --install apt install cargo dh-cargo debcargo -y
Then the packages must be repackaged and the architecture from amd64 to arm64 renamed. Afterwards, it can be repackaged by running:
dpkg-deb -Zxz -b
This is much work but luckily there's a script to do this.
Install Build Dependencies:
Establishing a port of this magnitude necessitates numerous and diverse building dependencies which must now be installed:
apt-get install devscripts build-essential autotools-dev autogen \
check pkg-config dh-autoreconf dkms doxygen \
groff quilt dpatch automake autoconf libtool lintian libdevel-cycle-perl \
libjson-perl libcommon-sense-perl liblinux-inotify2-perl libio-stringy-perl \
libstring-shellquote-perl dh-systemd rpm2cpio libsqlite3-dev sqlite3 \
libglib2.0-dev librrd-dev librrds-perl rrdcached libdigest-hmac-perl \
libxml-parser-perl gdb libcrypt-openssl-random-perl \
libcrypt-openssl-rsa-perl libnet-ldap-perl libauthen-pam-perl \
libjson-xs-perl libterm-readline-gnu-perl oathtool libmime-base32-perl \
liboath0 libpci-dev texi2html libsdl1.2-dev libgnutls28-dev \
libspice-protocol-dev xfslibs-dev libnuma-dev libaio-dev \
pve-libspice-server-dev libusbredirparser-dev glusterfs-common \
libusb-1.0-0-dev librbd-dev libpopt-dev iproute bridge-utils numactl \
glusterfs-common ceph-common python-ceph libgoogle-perftools4 \
libfile-chdir-perl lvm2 glusterfs-client liblockfile-simple-perl \
libsystemd-dev libreadline-gplv2-dev libio-multiplex-perl \
libnetfilter-log-dev libipset3 ipset socat libsasl2-dev libogg-dev \
python-pyparsing libfilesys-df-perl libcrypt-ssleay-perl \
libfile-readbackwards-perl libanyevent-perl libanyevent-http-perl \
unzip liblocale-po-perl libfile-sync-perl cstream \
lzop dtach hdparm gdisk parted ttf-dejavu-core \
liblzma-dev dosfstools mtools libxen-dev libfuse-dev libcpg-dev libquorum-dev \
libcmap-dev libuuid-perl libqb-dev libapparmor-dev docbook2x libcap-dev \
dh-apparmor graphviz libseccomp-dev libglib-perl libgtk3-perl libnss3-dev \
libdlm-dev libudev-dev asciidoc-dblatex source-highlight libiscsi-dev \
ibiscsi7 librsvg2-bin libarchive-dev libgpgme-dev libcurl4-gnutls-dev \
libtest-mockmodule-perl libjemalloc-dev libjpeg-dev
Compiling:
git clone https://git.proxmox.com/git/qemu-server
git clone https://github.com/jiangcuo/Proxmox-Arm64
cd qemu-server
for i in `ls ../Proxmox-Arm64/Patch/qemu-server/` ; do patch -p1 <../Proxmox-Arm64/Patch/qemu-server/$i ; done
yes | mk-build-deps --install --remove
make deb
git clone https://git.proxmox.com/git/proxmox-acme-rs.git
cd proxmox-acme-rs
yes | mk-build-deps --install --remove
make deb
Supported Platforms
These platforms collectively contribute to the expanding ecosystem of ARM64, catering to various needs and applications, from hobbyist projects to enterprise-level computing. It's important to note that the level of support and capabilities may vary across these platforms:
* Rockpi (arm64)
* Raspberry Pi (arm64)
* Amlogic TV Box (arm64)
* Kunpeng (arm64)
* FT (arm64)
* Ampere (arm64)
* Apple (arm64, vm only, no kvm support)
Apple devices, such as Macs with M1 or later chips, support the ARM64 architecture but are limited to virtual machine (VM) usage, lacking Kernel-based Virtual Machine (KVM) support.
Downloads
* proxmox-ve_8.1-3_arm64.iso
* Vagrant Box gyptazy/proxmox8.1-arm64