After Broadcom increased the license fees, other virtualization alternatives become very popular. While I previously already evaluated various virtualization platforms, including Proxmox, as well as other solutions that are based on FreeBSD, such as bhyve-webadmin (BVCP), and ClonOS there are of course also several other ones and it is worth noting another noteworthy option in the landscape of hyperconverged infrastructure (HCI).
Harvester is an innovative, open-source HCI platform that is built atop of Kubernetes, offering a cloud-native approach to infrastructure management. It is tailored for operators who are in search of an open-source HCI solution that can seamlessly integrate with their existing systems. Harvester is engineered to be deployed directly on bare metal servers, where it provides a combination of virtualization and distributed storage functionalities.
This solution is not limited to managing traditional virtual machines, it also embraces the containerization trend by facilitating containerized workloads through its integration with Rancher. This feature positions Harvester as a bridge between the conventional virtualized systems and modern container-based applications, enabling a smooth transition for organizations moving towards container technologies. It is designed to deliver a unified infrastructure experience, from centralized data centers to remote edge locations.
In this blog post I will show how it works and also have a look at its web frontend for managing the systems. Before starting this, let us have a short look at HCI and Harvester in general.
HCI vs classic Virtualization
First, we need to understand that Harvester follows a different approach as a hyperconverged infrastructure (HCI) solution. Hyperconverged infrastructure (HCI) and classic virtualization environments such as ESXi and Proxmox represent two different approaches to managing IT resources in a data center.
HCI is a comprehensive solution that converges compute, storage, and networking into a single system. It simplifies the data center architecture by combining all the necessary components into a single, integrated platform that is easy to deploy, manage, and scale. HCI solutions often leverage a software-defined approach, which means that the management and orchestration of the resources are done through software rather than hardware. This can lead to greater flexibility and ease of management, as well as potentially lower costs due to the reduced need for specialized hardware.
HCI platforms often come with native, tightly integrated virtualization capabilities, but they can also work with traditional hypervisors. They are particularly well-suited for organizations looking to adopt a cloud-like infrastructure on-premises, with the ability to scale out by adding more nodes to the cluster.
On the other hand, classic virtualization environments like ESXi and Proxmox are more traditional in their approach. ESXi is a type 1 hypervisor that runs directly on the host's hardware to control the hardware and to manage guest operating systems. Proxmox VE is an open-source server virtualization environment that's similar to ESXi but also provides a built-in web interface for server and VM management.
Classic virtualization platforms are often used in environments where the separation of compute, storage, and networking components is preferred or where there is already an investment in separate storage arrays and networking equipment. This approach is regularly applied to achieve optimal performance from the components. Within this blog post, I wrote about the NVMe-oF integration of NetApp storage appliances into Proxmox VE environments. They provide a high level of control and flexibility for administrators who are used to managing these components independently.
Classic virtualization environments are typically well understood by IT professionals and have been the standard in many data centers for years. However, they can be more complex to manage at scale due to the need to coordinate between different hardware and software vendors.
Harvester
As already said, Harvester, as a HCI platform, differs from the traditional and classic virtualization platforms. Therefore, we should examine the constituent elements it is made of and learn about its operational mechanics. In addition, Harvester also supports the ARM64 (aarch64) hardware architecture.
Features
Harvester presents a streamlined, enterprise-grade infrastructure solution that capitalizes on the simplicity of local, directly-attached storage, bypassing the intricacies of external SANs. However, there are also easy to use solutions to use NetApp storage appliances in Harvester by installing the Netapp Astra Trident CSI driver. Streamlining all the features, Harvester provides the following key features:
* Easy & Simple Start.
* VM Lifecycle Management.
* VM Live Migration.
* Storage Management.
* Network Management.
* Rancher Integration.
Architecture
The Harvester architecture is built using state-of-the-art open-source technologies. Therefore, Harvester consists of the following key technologies:
* SUSE Linux Enterprise Micro 5.3.
* Kubernetes.
* KubeVirt.
* Longhorn.
It also bundles and includes robust monitoring and logging solutions with Grafana and Prometheus.
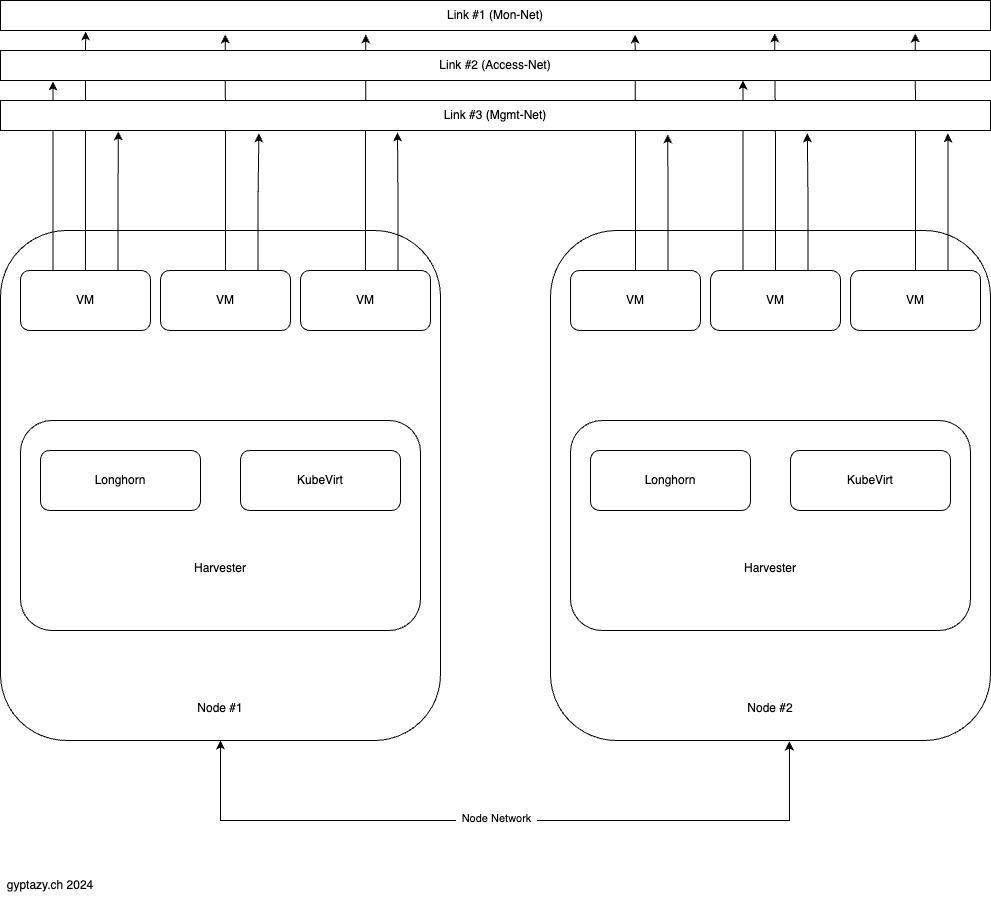
Each node in the system executes Harvester, which includes components like Longhorn and KubeVirt.
Longhorn is a distributed block storage system for Kubernetes, providing highly available, reliable, and easy-to-use persistent storage for Kubernetes clusters. It ensures that your data is stored redundantly across multiple nodes, protecting against hardware failures and providing snapshot and backup capabilities.
KubeVirt is an extension of Kubernetes that allows you to run and manage virtual machines (VMs) alongside container workloads. This integration enables you to leverage Kubernetes' orchestration capabilities for both containers and VMs, providing a unified platform for diverse workloads.
Each node in the Harvester setup runs a specified number (n) of VMs. These VMs can access different network links, allowing for the creation of more complex network setups. This flexibility enables the simulation of various network configurations and scenarios, enhancing the versatility and utility of the Harvester environment.
 |
Installation
Harvester is designed for simplicity and efficiency, making it easy to install on bare metal systems. You can set it up using various methods, ensuring flexibility and convenience. First, Harvester can be installed using a regular ISO image. Simply download the ISO file, burn it to a CD/DVD, or create a bootable USB drive. Boot from the media and follow the straightforward installation steps. Additionally, Harvester supports PXE Boot, allowing for network-based installations. This is particularly useful in environments where multiple systems need to be set up simultaneously. Finally, installation via USB is another hassle-free option. Create a bootable USB drive with the Harvester ISO and boot your system from the USB to initiate the installation process. Whether using ISO, PXE, or USB, Harvester's installation is designed to be straightforward and user-friendly, even for those without extensive technical expertise.
Note: Harvester requires a lot of systems resources even for test- & development setups where even for such ones 32GB memory per node are required. You can find all requirements here.
Configuration
Within my setup, it consists of three nodes with the following IP addresses: harv01 (10.10.10.210), harv02 (10.10.10.212), and harv03 (10.10.10.213). The configuration and management IP is reachable at 10.10.10.31. This setup ensures efficient and organized management of the small Harvester environment.
 |
* https://10.10.10.31
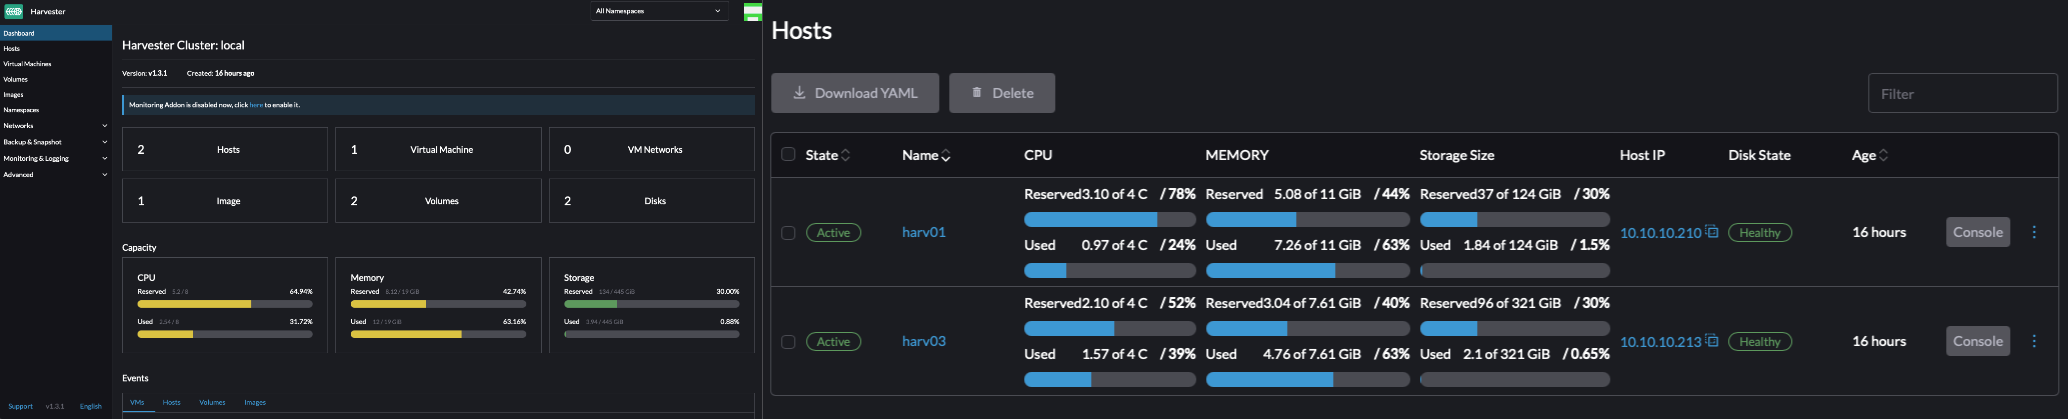
After the installation of Harvester, the overview page provides a comprehensive snapshot of the current state of the cluster. This page is designed to give you an at-a-glance understanding of the health and performance of your Harvester environment. It displays detailed metrics for each node in the cluster, including their IP addresses: harv01 (10.10.10.210), harv02 (10.10.10.212), and harv03 (10.10.10.213).
The overview page presents critical metrics such as CPU usage, memory utilization, and storage size, along with their current consumption levels. This allows you to monitor the resource allocation and usage across the entire cluster efficiently. Additionally, the page shows the current state of each node within the cluster, helping you quickly identify any issues or performance bottlenecks.
 |
Creating VMs
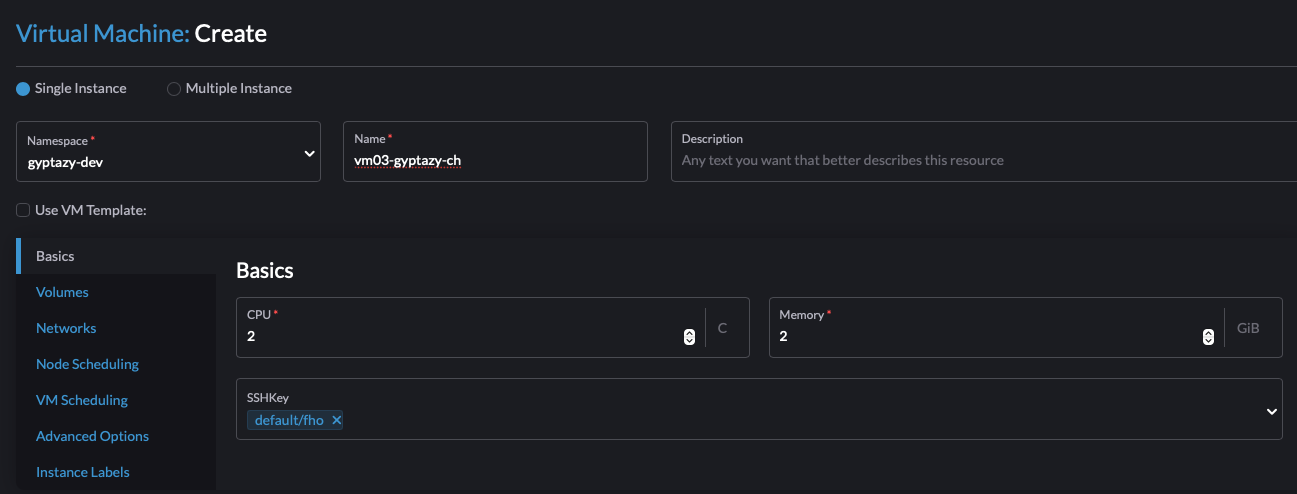
In Harvester, users can effortlessly define all the necessary parameters for a new VM from the web interface. The process includes selecting the required ISO file to boot the VM, specifying the virtual disks, and configuring the hardware specifications such as memory, disk size, and CPU count. This comprehensive yet user-friendly approach eliminates the complexities typically associated with VM creation, allowing both novices and experienced users to deploy VMs quickly and efficiently.
 |
Live Migration of VMs
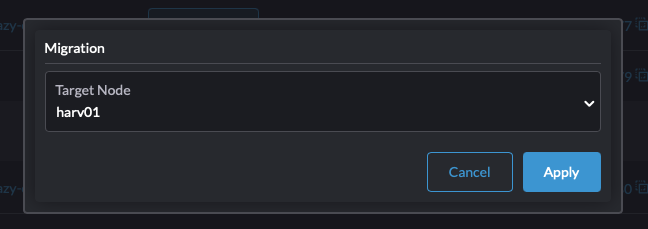
The live migration in Harvester is incredibly straightforward and can be fully managed through the provided web UI. This user friendly interface simplifies the entire process, making it accessible even to those with minimal technical expertise. Additionally, the underlying operations are transparent where users can easily observe the spawning of new pods and the mechanics of the migration as it happens in the background. This combination of simplicity and visibility ensures a smooth and efficient migration experience.
 |
 |
Adding New Nodes to the Cluster
Integrating new host nodes into a Harvester cluster is straight forward and efficient. To add a new node, a traditional installation is started where you choose to join an existing cluster. During setup, input the management address of the existing cluster and provide the join seed. Once installation is complete, the node will automatically reboot. Upon reboot, it will seamlessly integrate into the cluster, ensuring smooth scalability and management of your infrastructure. Afterwards, the node can be managed from the cluster management web ui.
Rancher Integration
Beginning with Rancher version 2.6.1, Rancher has seamlessly incorporated Harvester, an open-source platform, for unified management of VMs and containers across multiple clusters. Through Rancher's Virtualization Management feature, users gain the capability to import and oversee numerous Harvester clusters. This functionality adds Rancher's robust authentication mechanisms and RBAC controls, ensuring comprehensive support for multi-tenancy scenarios. However, it still also requires the other part on Harvester. All the next steps for setting up Rancher are explained here in detail.
Netapp Astra Trident CSI driver Integration
Note: This procedure only works to access storage via iSCSI, not NFS.
Integrating the NetApp Astra Trident CSI driver into a Harvester cluster enhances storage management by enabling dynamic provisioning of storage resources. Thanks for the ease of the underlying Kubernetes the integration is straight-forward but requires kubectl and helm to be already present on the systems.
Add Trident Helm Repository:
$> helm repo add netapp-trident https://netapp.github.io/trident-helm-chart
$> helm repo update
Create a Namespace for Trident & Install:
$> kubectl create namespace trident
$> helm install trident netapp-trident/trident-operator --namespace trident
Create the Trident CRD:
apiVersion: trident.netapp.io/v1
kind: TridentOrchestrator
metadata:
name: trident
namespace: trident
spec:
imageRegistry: ""
debug: true
Apply the CRD:
$> kubectl apply -f trident_cr.yaml
Create Trident Backend Configuration:
{
"version": 1,
"storageDriverName": "ontap-nas",
"managementLIF": "10.10.10.200",
"dataLIF": "10.10.10.201",
"svm": "svm_name",
"username": "your_username",
"password": "your_password",
"storagePrefix": "trident_",
"aggregate": "aggr1",
"defaults": {
"spaceReserve": "none",
"exportPolicy": "default",
"snapshotPolicy": "none",
"securityStyle": "unix",
"encryption": false
}
}
Apply the Trident Backend:
$> kubectl tridentctl create backend -f ontap_backend.json
Create a Storage Class:
kind: StorageClass
apiVersion: storage.k8s.io/v1
metadata:
name: trident
provisioner: csi.trident.netapp.io
reclaimPolicy: Delete
parameters:
backendType: "ontap-nas"
Apply the Storage Class:
$> kubectl apply -f storage_class.yaml
By following these steps, you should have successfully integrated the NetApp Astra Trident CSI driver into your Harvester cluster, enabling advanced storage capabilities and management.
Conclusion
Comparing Harvest as an HCI solution to traditional Proxmox or VMware ESXi virtualization, several key factors emerge that highlight the strengths and weaknesses of each approach. Harvest, as a hyper-converged infrastructure (HCI) solution, integrates compute, storage, and networking into a single system, providing a simplified and scalable infrastructure. This integration allows for streamlined management and ease of scaling, making it an appealing option for organizations looking for simplicity and efficiency. The main advantages of Harvest include its unified management interface, reduced hardware footprint, and the ability to scale seamlessly as needs grow - integrating a new node to an already present cluster can be done in minutes. Additionally, the integrated nature of HCI can lead to improved performance and reduced latency due to the close proximity of resources.
On the other hand, traditional virtualization platforms like Proxmox and VMware ESXi offer a high degree of flexibility and control. Proxmox, being an open-source solution, is highly customizable and cost-effective, appealing to organizations with specific requirements and technical expertise. It supports a wide range of operating systems and applications, providing robust virtualization capabilities. VMware ESXi, a well-established and widely adopted solution, is known for its reliability, comprehensive feature set, and strong support network. It offers advanced features such as high availability, fault tolerance, and extensive third-party integrations, making it suitable for enterprise environments with complex needs.
However, these traditional virtualization platforms come with their own set of challenges. They often require more complex setup and management, demanding a higher level of expertise from IT staff. Scaling traditional virtualization environments can be more cumbersome and costly, as it typically involves managing separate components for compute, storage, and networking.
In conclusion, the choice between Harvest as an HCI solution and traditional virtualization platforms like Proxmox or VMware ESXi depends on the specific needs and priorities of an organization. Harvest excels in providing a simplified, scalable, and integrated infrastructure, making it ideal for organizations seeking efficiency and ease of management. Conversely, Proxmox and VMware ESXi offer greater flexibility, customization, and advanced features, making them suitable for environments that require robust and tailored virtualization solutions. Each approach has its own set of pros and cons, and the best choice will depend on factors such as the organization's technical capabilities, budget, and specific infrastructure requirements. If all of this was not already enough you may find with ClonOS another FreeBSD based virtualization possibility, which uses bhyve.
Resources:
* Harvester Documentation
* Harvester ISO file(s)
* Harvester Architecture Overview